Sunday, March 28, 2010

Period Makeup: 1920-1930

In my last class, we learned to recreate looks from the 1920's and 1930's. This comes in handy once we're on the field already and are asked to do makeup for photo shoots & events inspired by these eras. Here's my friend Jade again for the 1920's.

Before

After

Haha, does it look like she really is from that period? I converted the image to black & white because I wanted to see if the lip color was dark enough to register as black on photo. Because the eyebrows from these eras were mostly thin, we used a wax to smooth out the hair and applied foundation over it. But because I didn't have a sealant, the strands started to pop out when I was almost done with the entire application. I also made her lips smaller here by exaggerating the cupid's bow.


And here she is back in present day with her regular eyebrows. The look became wearable once I removed the wax. Thanks again dear for letting me practice on you! =D

Now for the 1930's, I didn't have a friend available so I just got a random girl from the building to be my model =p
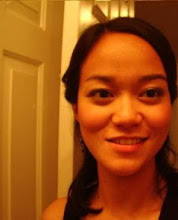
Before

After

Closed Eyes

I really saw the difference when I used sealant on her eyebrows after putting wax. The area stayed smooth even after I was done with her makeup! The only booboo here was that the foundation was too dark so it was still quite noticeable in the photo. I also altered the natural shape of her lips by adding a wide V in the upper middle part. Unlike the 1920's lips, this version doesn't dip as sharply in the cupid's bow and the entire lip looks fuller and more round.

Thursday, March 25, 2010

From No Makeup to Bridal

This was a nerve-wrecking afternoon. Hehe, we were under a time limit and did 2 looks on 1 model. First was the no-makeup makeup where the face needs to look fresh & clean with no visible traces of the product. They say this is one of the hardest looks to master.
 
Before

After (no makeup look)

Then we moved on to bridal makeup where you use neutral but intensified colors. I also got to apply false eyelashes for the first time. Wee!!! Thanks Grace for spending the afternoon with me! I hope you enjoyed it as much as I did :)
 
After (bridal look)

Closed Eyes
Lessons Learned
- If the color of the foundation still doesn't match the skin perfectly after application, adjust it by dusting a darker or lighter shade of powder. There should be no difference at all between the face and the neck.
- Stick to the apples of the cheeks when applying blush and make sure not to extend it too much inward when blending. Otherwise, it can look like your model is having allergies instead of the natural flush on the cheeks that you were going for.
- When buying falsies, get a pair that looks natural and isn't too thick. In my case, the lashes were too long and it overwhelmed the entire face. Once my model opened her eyes, I couldn't see the eye shadow anymore even though I blended it up to the crease.
- Always set the look with powder after all the makeup's done. Then check from time to time if the t-zone is already starting to become oily and blot/retouch if necessary.

Makeup for Weddings

Over the weekend, we were asked to bring in 3 models in class: a little girl, a man and a mature woman. Being a makeup artist doesn't mean you'll always work on women in their 20's or 30's. Our teacher also wanted us to understand how the application becomes different for other folks. This happens a lot during weddings with the flower girls, the groom and the mothers of the couple. Kids aren't supposed to look made up and shouldn't look like tiny adults in these occasions. Men shouldn't look like girls either and mature women need age appropriate colors and moisturizing products on their face. For this session, I tagged along my aunt, niece and boyfriend. It was already a family affair on its own! ;p


All Dolled Up: Smoky Eyes

Last week, I decided to always bring my makeup kit every Thursday so I can practice on my office mates after work. Rain was my first victim. Hehe. I tried the smoky look on her because I wasn't able to do this the last time in class. I love how the dark eyeshadow opened up her eyes. I also realized that smaller brushes definitely come in handy for chinitas like her because it helps me control the color blending on her eyelids.

 
 Before

 
After

Tuesday, March 16, 2010

Practice Makes Perfect

Right after my long & tiring day at makeup school, I realized I need to kick it up a notch with my midterms coming up next week. And I'm panicking already because I still can't finish a complete flawless application in 1 hour! So, I decided to ambush my friend Jade last Sunday and practiced my makeup skills on her. Thank you dear for letting me crash at your place =D

Before

After
No, I didn't fix her hair too. Hehe, it was still wet when I took the first photo. Yes, that's how early I bugged her in the morning! =p

Closed Eyes
Lessons Learned
- Again, blend, blend, blend! 
- Be more careful with skin matching, esp. with only natural light on. I was so used to applying makeup at school where the mirrors had light bulbs that let you see all the colors on the face accurately. With just natural daylight, it gets trickier so the foundation has to suit the face & neck perfectly. Next time, I ought to take photos even with only the foundation & concealer finished so I can check early on if my formulation was indeed correct.
- Trim the eyebrows before applying moisturizer & foundation to prevent small hair strands from sticking to the skin.

Saturday, March 13, 2010

Play with Colors

This is the 2nd day I brought models to class. We were supposed to do bridal makeup but ended up experimenting with colors instead. Thanks Apple & KL for letting me practice on their faces! And for encouraging me whenever I got stressed with learning the proper techniques & meeting the time limits. You girls are the best! :D

Before

After

Before

After

Closed Eyes

Lessons Learned
- Eyeshadow shouldn't extend past the outer corner of the eyes because this will make the face look sad.
- Correct mistakes with a cotton swab dipped in makeup remover. Then cover with foundation or concealer again once cleaned up.
- Find a high-quality lash glue to make sure falsies stick properly. Don't always rely on those that come with the eyelash kit!


And that's me trying to mix the right foundation shades to match my model's skin tone. Thanks KL for taking this shot! She's right, it's nice to keep a photo of myself at work. I don't feel so bad anymore with my booboo's earlier. Just really need to keep practicing to get it right and focus on blending, speed and false eyelashes application :)

Sunday, March 7, 2010

Natural Day Makeup

These were my first jabs at a full makeup application on someone else. I just realized it really takes a lot of hard work! Different faces have different structures which you have to balance when putting on products. I have so much more to learn and will be needing lots and lots of practice, esp. on eyebrow shaping and lining the lash line. Thanks to Mia & Cathy for agreeing to be my models on this day =D

Before

 
After

Before

After 
Lessons Learned 
- Always take photos after cleansing the face, not when the model comes in since it's possible there's still some trace of makeup on the face even when it looks natural.
- Use black color to fill up very thin eyebrows with light strokes. Browns will only look very fake on the skin beneath. 
- Don't be afraid to trim the eyebrows & curl the lashes but be very careful when pressing the curler to avoid catching the skin!
- Balance & blend well the eyeshadow on both eyes. Take note how it looks like on the eyelids when closed. 
- Use a no-color loose powder to avoid affecting the foundation shade that was customized for the model's skin tone.

Thursday, March 4, 2010

Makeup 101: Concealers

Concealers can be challenging to apply, especially to novices. But like with any other makeup component, the key lies in blending well and of course, practice. If it cakes around your eyes, that means you've applied too much. It's always better to use very little at a time and spread it evenly over the area you're trying to conceal before adding more. When in a rush, I use my fingertip but if you have time, you're better off with a concealer brush because it covers the tiniest areas and even the finest lines. Please apply it gently and avoid tugging the skin around the eyes which is very delicate. The ring finger is supposedly the lightest to the touch.

 
Makeup Forever 5 Camouflage Palette Cream - No. 5
 
I've read several times that your safest bet for those dark circles is a yellow-based tone in a shade lighter than your natural skin color. Luckily, most brands in the market have that. Now what about colored concealers? They're not to be taken literally, ok? This is backed up by the color wheel concept, which means there's an opposite shade that neutrilizes every color. Yellow complements violet, green is for red and orange for blue. Yes, that applies to makeup too. So for those dark undereye circles which look purplish, you need yellow to cover it. If you have pimples, you can counter that by mixing your cream/liquid foundation with the green concealer before applying on your skin. Please note that you don't apply the pastel concealers directly on the face because that makes it more difficult to achieve a natural finish.

The palette shown above has 2 skin-tone colors which you can mix to achieve the shade closest to your natural color or combine with the pastels depending on the coverage you need. This product costs Php 1,800 at Makeup Forever stores. Graftobian HD is another brand which also has color correctors. They're priced at Php 1,400 and are available at Suesh. Personally, I wanna try Face Stockholm's corrector kit because it was featured on InStyle but that can only be ordered online for $32. If you have relatives in US or Sweden, ask them to get this for you. I believe this gives you the best bang for your buck! :)